|
The FirebrandX Story for Pixel Perfection: |
|
In the Beginning... I started video gaming with the Atari 2600 in California and have own/played just about every console released in the 1980s to present day. I remember during the boom of the NES, I would marvel at how clean the published screenshots looked in gaming magazines like Nintendo Power for example. To me, it seemed like a mythical/magical ability to see the graphics that cleanly. I envied the select few that got to work behind the curtains with such clean displays. Remember the black Official Nintendo Player's Guide book? Remember how clean the graphics looked in those pictures? I wanted that.
1989:
My first attempt to improve my own visual gaming experience was to toss out the RF modulator that came packaged with my NES and instead use the A/V composite ports on the side of the console. We had never tried this before, and I remember my brother being seriously concerned that using them might 'fry' his VCR. It can be laughed about now, but back then, being tech-savvy was exceptionally rare. You either had a TV that used 'pitch-forks' or the 'screw cable ' and that was that. At any rate, using composite cables was a major step up from the RF box. Gone were what I called "heat-wave" interference, and the colors looked more vivid. Even still, I could tell this couldn't be as good as it got, because those gaming mag screenshots had details not even composite video could touch.
1993:
By this point, I had continued to use composite cables on through the Sega Genesis, Neo Geo, and now the Super NES. Then came the Star Fox weekend competition. I ended up placing 2nd, having lost to a friend (I was totally jelly of his flight jacket prize). During the competition, I noticed the picture quality on the large TV used in the contest looked incredibly sharp and detailed. I had to ask the tournament director, Frank, how he was getting such an amazing picture. Frank shows me this strange black video cable I had never seen before in my life, and it had these little pins inside of it. Frank then tells me the cable is called "SVHS" and has to be specially ordered from Nintendo or purchased from an authorized dealer (which he was). I bought a cable from him on the spot, even though I knew my TV didn't have this 'SVHS' format supported (later it would be universally recognised as 'S-Video', since SVHS was an incorrect labeling some manufacturers like Nintendo used).
1994:
I immediately began saving up for a new TV, and learned through catalogs and word-of-mouth that Sony made the best TV sets called "Trinitrons". It took a while, but I eventually purchased a 27-inch Trinitron of my very own. It had TWO S-video inputs, and when I plugged the SNES into one of them and fired up Super Street Fighter 2 with the sharpness turned up high, I was that one step closer to finally seeing pixels in their proper pristine state. My roommate took notice when I dialed in that perfect sharpness, to which he replied "Oh yeah, that's the sweet spot".
I got even closer to perfect pixels when I opted to rent-to-own a Neo Geo arcade 4-slot. In this case, the hardware was natively hooked up to the monitor in RGB. Here then were absolutely pure graphics, and it was quite a distinction from even S-Video. At that time however, I didn't have a clue how arcades worked or even how the RGB was wired to the monitor, so all I could do was enjoy it and wish I had my home consoles in the same clarity.
1997:
By this point, I had S-Video for SNES, Playstation, and N64. I also had my 2nd arcade machine, this being Kung Fu Master. This time though, my brother had managed an arcade for a couple years, and he had service manuals and guide books on servicing arcade machines. I obessively read and re-read one of the books by Randy Fromm. I learned from this guide book how the RGB and Sync wires were hooked into the monitor. I knew it 'should' be possible to hook a console up to that same arcade monitor and have it work. So I chose to start with the Sega Genesis since I never saw it in anything better than composite output. Through trial and error using soldered small nails as pins, I was able to map out the pin ports in the Genesis's 8-pin din socket. I then wired up the RGB and Sync to the monitor, and there playing before me was the Phantasy Star II title screen in gloriously pure color RGB! But... It was upside down and inverted. Thankfully the Fromm book even showed how to correct this by inverting the wires on the main board of the monitor going to the neck of the tube. It worked perfectly, and I was floored. FINALLY, I was seeing how the graphics SHOULD have been seen all along, and I immediately made a SNES RGB cable to hook into the monitor as well.
2000-2007:
Eventually we moved, and I had to dump the arcade machine to lose bulk for the trip. I was back to using S-Video for all my systems that supported it, and it seemed I had experienced as best as I would get for visual clarity. Then I bought my first PC in 2000 and started gaming on it. Thankfully PCs were already full RGB, and I was quite happy to not have to worry about clarity solutions. Eventually I would discover the world of emulation, and at long last, I got to see pristine graphics for all my old favorite games on the NES and other systems. The downside is I just didn't like the compatibility issues, the jumpy scrolling, or cracky sounds. So it became a waiting & hunting game as I tried each new emulator that came out and would master all the features and options each had. No matter which emulator I tried, there was always SOMETHING I didn't like, whether it be sound or graphics related. It was during this period that I learned about aspect ratios and how consoles like the NES and SNES looked oddly squished on PC monitors. It became a choice of either playing with blurry pixels and a correct aspect ratio, or playing with perfectly sharp pixels and an incorrect aspect ratio. Neither case really worked for me, though I opted for sharp pixels. The dream still wasn't realized the way I wanted... *
* For more information on aspect correction, click the following link: Classic Console Aspect Correction
2007-2013:
With the release of the PS3, I saved up and bought a new HDTV display, which was a gigantic 55-inch flat panel from Sony. My family and I had never owned a TV this large, so this was a major upgrade for our home theater. With HDMI being the new cable standard, I of course bought HDMI cables for the PS3 and was thrilled to see the digital clarity that matched the DVI signal my PC was using. My Sony TV also had various component and composite inputs, but no S-video. This was a major setback in that my old consoles would have to be downgraded to composite video. As expected, they looked like crap, and even worse, the TV was incorrectly displaying only half the frame fields for the 240p consoles like the NES, Genesis, and SNES. This resulted in flickering objects having a 'comb' artifact, and it was intolerable.
2013:
I began looking for a better solution to make use of the new HDMI standard, and I learned there were devices called "upscalers" that would convert the old console video signal into HDMI so my big Sony display could handle them properly. Then I learned about "SCART" which was a cable standard that had long-since been used in Europe. Apparently these cables could in fact pull RGB from those older consoles, meanwhile we in North America were just left to do without because we're treated as "idiot consumers" by the suits that determined what kind of display technology we would have for decades. Not knowing what all SCART cables entailed, I ordered a SCART upscaler for $50 and a SCART cable for the Genesis and SNES. When everything arrived, I eagerly hooked up the SNES, and proceeded to be horribly disappointed. The image quality still looked like absolute crap! I thought to myself "Wow, is this the crap that's supposed to knock my socks off about SCART? I'm not impressed at all". So I tossed the SCART cables in the garbage and threw the upscalers I bought into the closet.
While frequenting various emulation and general nostalgia gaming sites on the Internet, I learned of a modification that could be done with the video processing chip in some models of the SNES. By soldering a few wires to some pins on the video chip, you could get brilliantly clean component video from the SNES directly! I had to give this a try as my TV's component sockets were just begging to be used. Unfortunately I found my SNES was one of the newer revisions that didn't have the proper chip in it, so I had buy the correct SNES I needed off a member on Nintendo Age. Thankfully that worked out, and I was successfully able to wire up the component mod inside the console. The picture was indeed clean a beautiful, but still my TV could not handle properly displaying both fields of the 240p signal. It would turn out not to matter, as the SNES console developed graphical errors soon after, like bad scaling warpage and garbage on number displays. I threw it in the closet along with all my other failed attempts and had pretty much given up on the subject...
2014:
Fate would not let go. I kept finding reference to and tremendous praise for an upscaling device called the "XRGB mini Framemeister" from a company in Japan called Micomsoft. Then I saw the price tag of $350 and dismissed it as unreasonable. I mean, I had tried SCART before and it looked like crap. There's no way I'm going to waste $350 to find out the same thing all over again. But people kept having 'nerdgasms' over this device, and so I thought I might take a fresh look at the technology and see just what I was missing. Thankfully I did, as I learned that SCART wasn't just an RGB cable, but rather the socket standard that carried everything from composite on up. This explained why my previous attempt at a SCART solution failed miserably. I hadn't done enough research to know exactly what I needed.
2015:
I ordered the Framemeister and set about making sure I was getting exactly the right cables I needed for the best picture quality. That's when I happened upon "My Life in Gaming" on Youtube, and they provided very informative videos on using the Framemeister with the correct kind of SCART cables. After reviewing all the material and comparing with other online resources, I decided what I actually wanted to use were "JP-21" cables. These cables look identical to SCART cables, only the 21 pins inside are wired differently according to Japanese specifications, hense they are called JP-21 cables. I chose this standard because the Framemeister came packaged with an adapter for this kind of cable. Going the SCART route meant you had to buy a separate adapter. I was merely saving a step I felt I didn't need to spend money on. Furthermore, I learned where to get the best cables that were designed specifically with the Framemeister in mind for the purist RGB quality possible. This would be the upgraded cable options offered by Retro_Console_Accessories on ebay. My first order was for the SNES RGB + CSync JP-21 cable.
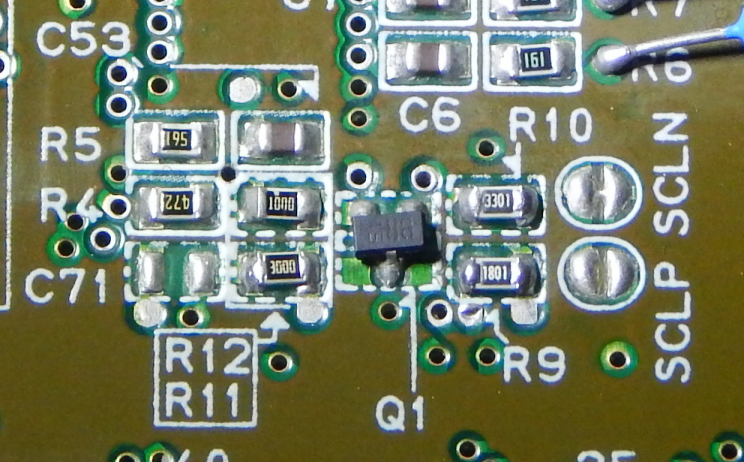
With the Framemeister and JP-21 SNES cable in hand, I hooked everything up to my TV and booted the systems. I was amazed at how beautifully sharp the pixels looked! They were nice rectangles of pristine glory, not blurry sizzly crap I had seen for so many years before. However, the image still wasn't quite the same as what others were describing and showing in their online screenshots and videos. That's when I realized there must be something wrong with my SNES console. For my display was showing ugly diagonal 'bars' in solid colors of the entire image. I wanted that clean, perfect, and solid look that only an emulator had given me up to that point. Doing more online research on SNES console revisions, I learned the one I had, the SNES-APU, was one of the very worst for picture quality specifically because of those diagonal bars. I then read how the "1CHIP" revision series had the best display quality of all the original console SNES units. With even more Googling and cross-referencing, I learned the very last revision of "1CHIP-03" had the very cleanest and sharpest quality of all. My goal was now clear: To obtain a SNES 1CHIP-03 console. Now hunting one down would be tricky because there's no 100% way to know without opening the case to find out. Anyone who does this already knows what they have and will either keep it or sell it at a higher asking price. So my only recourse was to use the serial number chart that had been loosely collated on the internet a couple years prior. From that database, I was able to determine I needed an NSTC SNES console with a serial number starting no earlier than around UN320900000 or there abouts. Now the next difficult part about hunting for a SNES with the proper serial range on ebay is that most sellers don't take photos of the underside of the units. Typically you're lucky if you get pictures of the back of the unit, much less the bottom. So I was forced to manually sift through a thousand ebay auctions and toss out ones that didn't have pics of the serial number. Then I had to toss out auctions where the serial number they did photograph was in the wrong range. After sifting through all of that, I was left with five 'plausible' auctions. The one that looked most promising was a very clean and perfect-colored plastic SNES console with a serial number of UN320962590. It was right at my target range, and I wouldn't be denied winning this auction if I could help it. I decided I was willing to pay $200 if need be, so I set an automated sniping program for that amount and went to bed. The next day, I found I had won the auction after a sniping war erupted at the very end. Turns out several others were eyeballing the same unit for the same reason I was. I ended with the winning snipe at $90. Totally worth it, and ironically a lot cheaper than if the other snipers had dared to test the waters with a regular bid earlier on. Still, I didn't know if I actually would be getting a 1CHIP-03. It may very well just be a 1CHIP-02, which wouldn't be all that bad of a deal anyway. However, I was also worried I might be screwed into getting a "board-swapped" SNES console, which is where the board from an earlier model SNES is swapped inside, making the serial number a misleading selling point. Thankfully my fears were laid to rest when I got that sucker in the mail and quickly disassembled it to find I had indeed scored a 1CHIP-03 SNES!
Now here I am with the coveted SNES 1CHIP-03, the JP-21 RGB + CSync cable, and the Framemeister. It was time to finally experience what I had saught after for more than 25 years... And the display showed nothing but a blank screen. WHAT?! NOOOOO!!!! I had to go back online and research what the deal was, and it ended up being that the 1CHIP-03 revision doesn't have the CSync line hooked into the multi-A/V port unlike ALL the other revisions. The good news is the mod for fixing this was relatively simple. All I had to do was solder a half-inch piece of insulated wire to two points on the bottom of the circuit board of the SNES. Very nervously I did as the mod instructed and closed the SNES unit back up. With my fingers crossed, I booted the console up on the Framemeister... And there it was. A glorious undisturbed image with beautiful colors and in the correct aspect ratio. Effects that made use of alternate field flickering displayed perfectly. It was like I was truly seeing the Super Nintendo Entertainment system for the first time in my life, and it wasn't some squished emulator. This was the real deal.
Update Sep 17th, 2017:
In the intervening couple of years since writing this article, I've learned quite a bit more about the inner workings of consoles, and I've gotten a lot more experienced with my soldering iron. In the case of the Super NES 1CHIP-03 and the missing csync components, it is now considered a bad practice to restore the csync signal via a jumper wire like in the above image. Instead, there are csync restoration kits sold online for the 1CHIP-03 consisting of all the missing surface-mount components you must solder onto the Super NES circuit board. Below are pics of my very first effort, which was a perfect success!
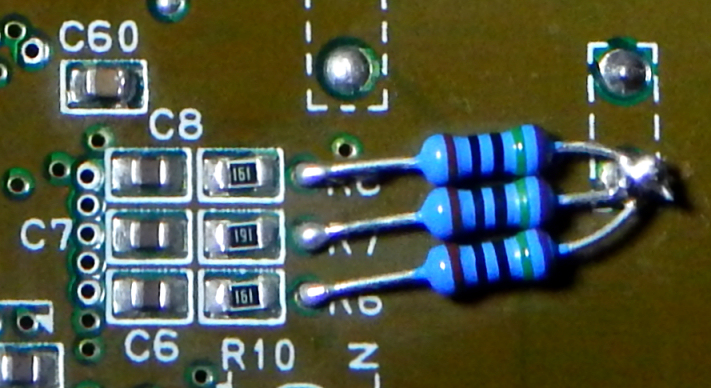
I've also soldered 750 Ohm resistors to the RGB lines on the circuit board to attenuate the brightness levels to within industry standards (these 1CHIP SNES console revisions were manufactured out of RGB brightness spec range):
Since Then:
I've gone on to collect several more systems, the OSSC, a gscartsw-lite, and a wonderful capture card by Datapath called the Vision E1S, which has allowed me to make lossless still image captures as well as live gameplay captures for tutorial Youtube videos.
The OSSC is proving to be a far superior upscaler compared to the Framemeister, although it is less compatible with displays. Having a combination of the two scalers is the ultimate, and I've even combined them in one case to circumvent issues with the Framemeister's 480p upscaling.
Also since writing this original article, many new HDMI solutions have come out for various consoles like the NES, SNES, N64, and Gamecube just to name a few. Things keep looking better and better for us older folks the grew up with these classic machines!
-FBX
|