|
Important Notes about the XRGB-mini Framemeister and my Custom NTSC Profiles: 1. As of at least the 2.00 firmware update, scanlines are closer to being 'tolerable' on 1080p output using my profiles. They are still not quite up to standards, but you can in fact use them now as an option. They look much better on the '4x' profiles than they do on the '5x' ones (due to the difference in pixel size). 2. I use strictly 1080p output on the Framemeister because that provides the sharpest picture on a 1080p display using a 1:1 native resolution matching ratio. Some of my console profiles require the HDTV to have its screen size set to "Full Pixel" (or whatever your brand of HDTV calls it when overscan zooming is turned off). I do have a few select 720 profiles, but I spend less time on these, and so they are more general in nature. 720 is actually a much easier mode to make your own profiles from, as typically when you turn ZOOM on, the default ZOOM settings are already at a perfect integer of the source game image. 3. When it comes to 240p gaming, I'm all about the clarity of the pixel as well as uniformity in upscaling. This means I don't use any sort of filtering or settings that would otherwise 'blur' the image in order to reduce aliasing. If the console sent a staircase of graphics to the display, that's exactly what my settings retain. Furthermore, some of my settings leave a black border on the top and bottom of the screen. This is to retain uniform scaling so that each pixel of the game's graphics have the same dimensions. To put in in mathematical terms, if you perfectly upscale a 240p image four times, you get a resolution of 960. Since there are 1080 lines of horizontal resolution on a 1080p display, that means you've got 120 lines left over. These will be black borders, and there's NO way around that without warping the pixel dimensions of the game's graphics to fill the screen. A pixel purist doesn't want warped graphics. A pixel from the top of the image should have the same dimensions as a pixel from the middle or bottom. Uniformity with sharpness sooths my obsessive compulsive nature. 4. It is assumed for the purposes of my settings details that the user has already updated the firmware using the download found on Micomsoft's web site. To do this update requires a microSD memory card and the ability to read it on your computer. Micomsoft coveniently offers an English language version of the latest update (2.03) for download HERE. There are plenty of guides and even Youtube videos on the procedure for updating the firmware, and all it takes is a little Googling to find them. 5. I want to stress that I can only speak for North American consoles in my settings guides. I don't have any experience with PAL formats in Europe. The same goes for my display usage as well. 6. There are some settings (like "Zoom" status) that will not load if you use "Load_Select". Instead, you need to use the "Load" option when loading a profile. 7. The new feature "SYNC_TIME" has an issue with glitching out the forced sync operation of Framemeister. Normally the SYNC_TIME feature set to 100 is useful for giving you plenty of time to swap cartridges in your console without having to wait for that annoying 8-second handshake delay. Unfortunately since it causes the forced sync mode to glitch out and default to frame-skipping, I'd advise leaving SYNC_TIME set to "3". 8. It's been discovered through sharing profiles online that some people have displays that require different "ZOOM_H_POS" and "ZOOM_V_POS" settings in order for the game image to be centered on the screen properly. If you feel the image might not be centered on yours, you'll need to adjust these settings until it is properly centered. Then you can save the new settings into the profiles you downloaded. 9. The Framemeister will only allow browsing of the first 20 profiles you store on the microSD card it uses. As such, you'll need to pick your top 20 most used profiles and save the rest as backups on your computer or other storage device. 10. My profiles are meant to be placed in the "EEPData" folder that is contained within the "XRGBmini" folder on the microSD. If you did a firmware update, these folders should already be on your microSD card. If you have not done a firmware update, see note #1 above. Framemeister's IMAGE_MODE: Those already familiar with the Framemeister know that it has several options for "IMAGE_MODE" in the menu. Most of these modes apply some sort of filtering or enhancement processing in addition to a couple different types of deinterlacing. For 240p gaming (most 8 and 16-bit consoles), you'll want to use "PICTURE" exclusively. For interlaced gaming (i.e. 480i), The best mode to use is "NATURAL". An alternative deinterlacing mode to use is "MOVIE", but this adds in a very faint film-like noise effect. Below is a breakdown of what each mode does: STANDARD: This mode applies Motion/Pixel Adaptive de-interlacing for interlaced games (typically 480i), and a low-pass filter that has the effect of blurring details and edges. On SSX 3 for the PS2, this low-pass filter removes all of the texture on the snow slopes. GAME1: This mode applies Linear/Bob de-interlacing, which has the effect of causing interlaced games to 'flicker'. This mode also applies a low-pass filter. GAME2: This mode applies Linear/Bob de-interlacing, which has the effect of causing interlaced games to 'flicker'. This mode also applies color enhancement, which causes white noise in the darker end of the color space in some cases. MEISTER: This mode applies Linear/Bob de-interlacing, which has the effect of causing interlaced games to 'flicker'. This mode applies both a low-pass filter as well as scanlines. Since scanlines can be enabled on any mode as of 1.11, this mode is now obsolete. ANIME: This mode applies Motion/Pixel Adaptive de-interlacing. This mode also applies color enhancement, which causes white noise in the darker end of the color space in some cases. MOVIE: This mode applies Motion/Pixel Adaptive de-interlacing. The Japanese manual suggests this mode adds in "film-like noise", however, this effect is so faint that you may not even notice it, but it will mess with video capturing processes if you're wanting to record your gaming footage. NATURAL: This mode applies Motion/Pixel Adaptive de-interlacing. The Japanese manual suggests the colors and textures are adjusted to match "natural landscape", which causes white noise in the darker end of the color space in some cases. This is the 'safest' mode to use for interlaced gaming. PICTURE: This mode does not apply any de-interlacing or filters/enhancements. Use this mode for progressive scan gaming. What is AUTO_SCALER? AUTO_SCALER is an option under the VISUAL_SET menu. AUTO_SCALER has 3 available settings: OFF
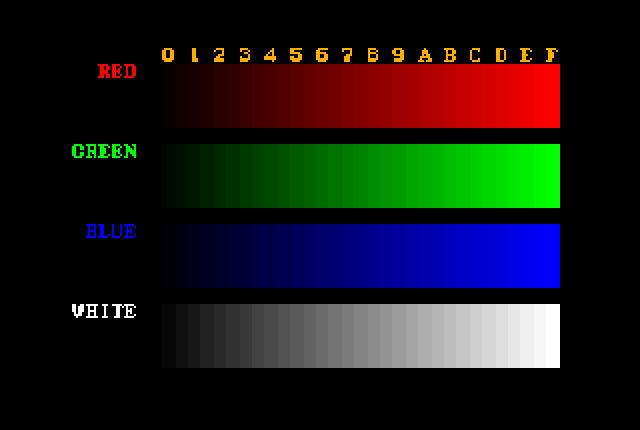
All the of these modes ONLY affect the H_SCALER and V_SCALER settings you see on the menu right below it. Using "GAME" mode sets the H_SCALER and V_SCALER both to a value of 6, while "VIDEO" changes the V_SCALER to a value of 5. So what do H_SCALER AND V_SCALER do? Simply put: They adjust the apparent focus on the horizontal and vertical axis. As such, it is always best to set AUTO_SCALER to "OFF" and adjust the H and V scalers to your liking. Some like the out-of-focus effect of having V_SCALER set to 5 for 480i & 480p gaming. For 240p and below gaming, having sharp focus looks spectacular. Here are the ideal settings for those consoles: AUTO_SCALER: OFF H_SCALER: 4 (or 5 if you don't mind some very slight artifacting for a hair more sharpness) V_SCALER: 6 (or 7 which appears to be just as sharp) Now for polygon-based 480i/p consoles, having sharp pixels actually can make the picture worse instead of better. The trick here is to blur the focus and then sharpen the textures instead of the pixels. Below are generally optimal settings to achieve this: AUTO_SCALER: OFF H_SCALER: 10 V_SCALER: 5 SHARPNESS: 1 The "SHARPNESS" setting can be found in the "COLOR_SET" menu. Framemeister Analog-to-Digital Color Calibration & Noise Issue: While the Framemeister puts out a superb image, it's not entirely clean. The process of converting analog signals to digital isn't done correctly by the Framemeister, and this results in subtle noise in certain shades of solid color. Originally I would fiddle with the A/D manual setting and adjust it to "push" the noise away in whatever game I was playing, but I discovered the A/D function is extremely sensitive and prone to "crushing" brighter colors from the source console image. "Crushing" means two or more colors of similar shading will no longer remain distinct, and instead will appear as the same color. So if you turn the A/D setting up, you're likely going to crush several top-end palette colors. Ideally, you'll want to calibrate your A/D setting using a color bar test pattern from Artemio's 240p Test Suit, which is valiable for most 240p consoles. You'll need a flash cart like the Everdrive series offered by Krikzz in order to load the Test Suit up on your console. Using Artemio's color bar test pattern, you should adjust A/D manually up or down until the top two green shades are BARELY distinguishable. This will be your optimal A/D setting for that console, and you should save it to your profile once you zero in on it. This value will be different from console to console. For example, my 1CHIP-03 SNES A/D value ended up being 120, while my RGB-modded N64 ending up being 140. Here's a picture of Atermio's color bar test for the SNES: Framemeister 480p False Contouring:
Unfortunately, the Framemeister adds in horizontal edge-softening or 'false contouring' on 480 progressive scan content. It's not a deal-breaker, but you can notice it if you're using sharp scaler settings. Hopefully Micomsoft will eventually fix this (and also hoping they are at least aware of the issue).
|